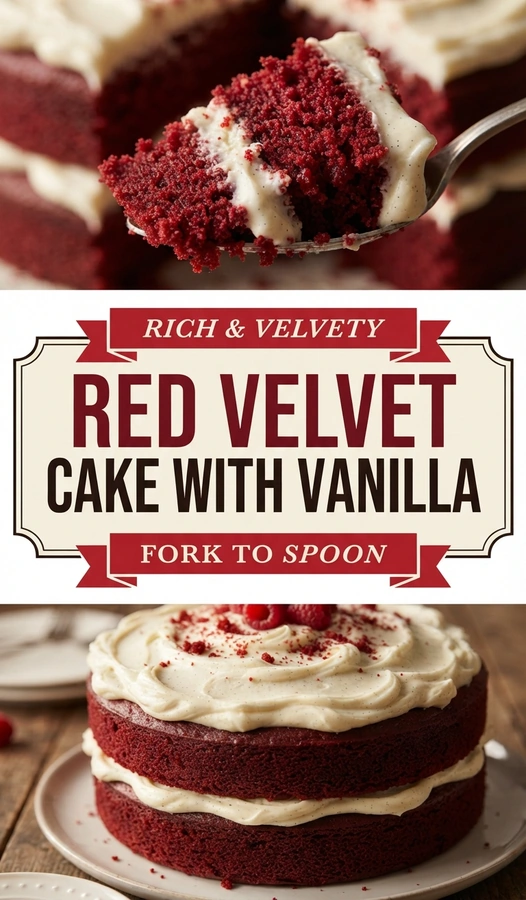
A deep crimson crumb yields to a cloud of white frosting speckled with tiny black vanilla seeds. This contrast makes the cake visually striking before the first bite even happens.
This recipe delivers a red velvet cake that balances a subtle cocoa depth with a tangy, moist texture. It avoids the overly sweet profile of store-bought versions high-quality fats and acids.
Most people appreciate this version because the frosting swaps the standard cream cheese tang for a sophisticated vanilla bean profile. The result is a cleaner, more aromatic finish that lets the cake’s flavor shine.
The uniqueness comes from the interaction between the buttermilk and the vinegar, which creates that signature velvety feel. While similar to an Indulge In Red Velvet Christmas Cake A Festive Delight, this version focuses on a timeless vanilla pairing.
Home bakers looking for a showstopper for birthdays or anniversaries will find this recipe reliable. It provides a professional look without requiring advanced pastry skills.
The kitchen fills with the scent of toasted cocoa and sweet cream as the layers cool. Here is everything you need to assemble this dessert.
- ●Why You’ll Love This Recipe
- ●A Brief Background / Why This Recipe Works
- ●Perfect For Elegant Celebrations and Holidays
- ●Main Ingredient Spotlight: Cocoa Powder
- ●Secondary Ingredient Spotlight: Buttermilk
- ●Key Ingredients
- ●How to Make It
- ●Pro Tips
- ●Delicious Variations
- ●Best Ways to Serve
- ●Storage and Leftovers
- ●Frequently Asked Questions
- ●Why This Recipe Belongs in Your Weekly Rotation
- ●Final Thoughts
This cake stands out because it prioritizes texture and aroma over artificial flavors.
- ●The crumb is tight yet soft, preventing the cake from crumbling during slicing.
- ●Vanilla bean pods provide a floral depth that extract cannot replicate.
- ●A precise ratio of cocoa ensures the chocolate taste is a hint, not the main event.
- ●Buttermilk adds a subtle tang that cuts through the richness of the frosting.
- ●The layers remain moist for several days thanks to the oil-based fat system.
- ●It offers a sophisticated alternative to the standard cream cheese frosting.
- ●The crimson color is vivid and consistent throughout every layer.
- ●The frosting is stable enough for piping but melts smoothly on the tongue.
- ●It pairs exceptionally well with fresh berries or a cup of dark coffee.
Combining these elements creates a dessert that feels luxury but remains approachable for a home kitchen.
A Brief Background / Why This Recipe Works |
Red velvet is less about a specific flavor and more about a specific texture. The reaction between acidic ingredients and cocoa creates a tender crumb that is distinct from a standard chocolate cake.
Using a combination of butter and oil provides the best of both worlds. Butter contributes the flavor, while oil keeps the cake moist even when refrigerated.
The vanilla bean frosting works here because red velvet has a mild, slightly acidic flavor profile. The aromatic sweetness of the vanilla complements the cocoa without overpowering the subtle tang of the buttermilk.
This balance prevents the dessert from feeling cloying, making it easier to eat larger slices.
Perfect For Elegant Celebrations and Holidays |
This cake is a natural fit for Valentine’s Day or anniversaries due to its striking color. Its refined look makes it an impressive centerpiece for a dinner party.
During the holiday season, it serves as a great alternative to traditional spice cakes. It pairs well with winter berries and festive table settings.
For family gatherings, the reliable structure of the cake makes it easy to transport and serve to a large group. It feels special enough for a milestone birthday but is simple enough for a Sunday treat.
Main Ingredient Spotlight: Cocoa Powder |
Cocoa powder provides the structural depth and the subtle chocolate undertone that defines red velvet. Unlike a full chocolate cake, the amount used here is limited to enhance the color and add a slight bitterness that balances the sugar.
Natural cocoa powder is preferred for this recipe because its acidity reacts with the baking soda to help the cake rise. This creates a lighter, airier crumb compared to using Dutch-processed cocoa.
Secondary Ingredient Spotlight: Buttermilk |
Buttermilk is the secret to the signature “velvet” texture. The lactic acid breaks down the gluten in the flour, resulting in a softer, more tender bite.
Beyond texture, buttermilk adds a mild tang that prevents the cake from tasting one-dimensional. If buttermilk is unavailable, a mixture of milk and lemon juice can work, though the flavor is slightly less complex.
Key Ingredients |
Quality ingredients are the foundation of this cake’s success.
- ●Cake Flour — provides a finer crumb and lower protein content for a softer texture.
- ●Unsalted Butter — adds richness and a classic bakery flavor to the batter.
- ●Vegetable Oil — keeps the cake moist and prevents it from drying out in the fridge.
- ●Buttermilk — introduces acidity for leavening and a tender crumb.
- ●Cocoa Powder — gives a hint of chocolate and helps achieve the deep red hue.
- ●Red Food Coloring — ensures the iconic, vibrant crimson appearance.
- ●Vanilla Bean — provides the primary aromatic flavor for the frosting.
- ●Heavy Cream — adds stability and a luxurious mouthfeel to the frosting.
How to Make It |
Follow these steps carefully to ensure the cake rises evenly and the frosting stays smooth.
- Prep the pans: Grease two 8-inch round cake pans and line the bottoms with parchment paper. This prevents sticking and allows the cakes to be removed cleanly after cooling.
- Cream the fats: Beat the softened butter and sugar together until the mixture is pale and fluffy. Over-mixing at this stage can incorporate too much air, causing the cake to sink in the middle.
- Incorporate wet ingredients: Add the eggs one at a time, followed , vanilla extract, and red food coloring. The batter should look like a smooth, vibrant syrup before the dry ingredients are added.
- Sift the dry components: Whisk together the cake flour, cocoa powder, baking soda, and salt in a separate bowl. Sifting is essential to remove cocoa clumps that would leave streaks of brown in the red batter.
- Combine and fold: Gradually add the dry ingredients to the wet mixture, alternating with the buttermilk. Mix only until the streaks of flour disappear to avoid developing too much gluten, which would make the cake tough.
- Bake the layers: Divide the batter evenly between the pans and bake at 350°F for 30-35 minutes. The cake is done when a toothpick inserted into the center comes out clean or with just a few moist crumbs.
- Cool completely: Let the cakes cool in the pans for 10 minutes before transferring them to a wire rack. Frosting a warm cake will cause the vanilla bean cream to melt and slide off the layers.
- Whip the frosting: Beat the butter until smooth, then fold in the scraped vanilla bean seeds, powdered sugar, and heavy cream. The frosting should be stiff enough to hold a peak but smooth enough to spread easily.
- Assemble the cake: Place one layer on a plate, spread a generous amount of frosting, and top with the second layer. Cover the top and sides, smoothing the edges with a spatula for a clean finish.
1Small adjustments in technique can lead to a much more professional result.
- ●2Use room temperature ingredients: Ensure eggs and buttermilk are not cold to prevent the batter from curdling.
- ●3Measure flour by weight: Using a kitchen scale prevents over-packing the flour, which often leads to a dry cake.
- ●4Scrape the bean thoroughly: Use the back of a knife to get every single seed from the vanilla bean for maximum flavor.
- ●5Chill the layers: Placing the cooled cakes in the freezer for 30 minutes before frosting makes them easier to handle and reduces crumbs.
- ●6Avoid over-baking: Start checking the cakes 5 minutes before the timer goes off to prevent the edges from drying out.
Delicious Variations |
You can adapt this base recipe to suit different tastes or dietary preferences.
- ●Cream Cheese Twist: Fold a small amount of cream cheese into the vanilla bean frosting for a hybrid flavor.
- ●Fruit Addition: Layer fresh raspberries between the cake and frosting for a tart contrast.
- ●Chocolate Ganache Drip: Pour a thin layer of dark chocolate ganache over the top for extra indulgence.
- ●Gluten-Free Option: Substitute the cake flour with a high-quality 1:1 gluten-free baking blend.
- ●Mocha Infusion: Add a teaspoon of espresso powder to the batter to deepen the cocoa notes.
These changes allow you to transform the cake from a classic dessert into something more experimental.
Best Ways to Serve |
Presentation enhances the overall experience of this visually stunning cake.
- ●Serve a slice with a side of fresh macerated strawberries.
- ●Pair with a glass of cold milk or a hot cup of Earl Grey tea.
- ●Dust the top with a light sprinkle of cocoa powder for a professional touch.
- ●Garnish with a few fresh mint leaves for a pop of green against the red.
For a more casual setting, you can slice the cake into small cubes and serve them as bite-sized treats on a platter. This is particularly effective for parties where guests are mingling.
If serving for a formal dinner, place the cake on a white ceramic pedestal. The stark white background makes the deep red and vanilla cream look more vibrant.
Storage and Leftovers |
Refrigerating
Store the assembled cake in an airtight container in the refrigerator for up to 5 days. Because of the butter and cream in the frosting, refrigeration prevents the cake from spoiling.
Reheating
This cake is best served slightly below room temperature. Remove a slice from the fridge and let it sit for 20 minutes before eating to allow the flavors to open up.
Freezing
You can freeze the unfrosted layers wrapped tightly in plastic wrap for up to 3 months. Thaw them in the refrigerator overnight before applying the vanilla bean frosting.
Frequently Asked Questions |
- ●Q: Can I use all-purpose flour instead of cake flour?A: While you can use all-purpose flour, the texture will be denser and less “velvety.” To mimic cake flour, remove two tablespoons of all-purpose flour from one cup and replace them with two tablespoons of cornstarch, then sift the mixture together several times.
- ●Q: Why did my red velvet cake turn brown?A: This usually happens if the oven temperature is too high or if the cocoa powder is too alkaline. Ensure your oven is calibrated correctly and use natural cocoa powder rather than Dutch-processed to maintain the bright crimson color throughout the baking process.
- ●Q: How do I stop the frosting from being too runny?A: If the vanilla bean frosting is too soft, it is likely because the butter became too warm during whipping. Chill the bowl and beaters in the fridge for 10 minutes, then whip the frosting again, adding a tablespoon of powdered sugar at a time until it reaches the desired stiffness.
- ●Q: Do I really need a whole vanilla bean for the frosting?A: A whole bean provides the characteristic black specks and a complex floral flavor that paste cannot match. However, if you are in a rush, you can substitute it with two teaspoons of high-quality vanilla bean paste, which contains the seeds and a similar flavor profile.
- ●Q: My cake sank in the middle; what happened?A: Sinking is often caused oven door too early, which lets out heat and collapses the structure. It can also happen if you over-beat the batter after adding the flour, which creates too many air bubbles that burst during the baking process.
Why This Recipe Belongs in Your Weekly Rotation |
While a whole cake is a large undertaking, the components can be scaled down into cupcakes for a quicker treat. Having a reliable red velvet base means you can create an impressive dessert for any occasion without guesswork.
The use of vanilla bean frosting elevates the cake from a standard dessert to a gourmet experience. It introduces a level of sophistication that makes ordinary afternoons feel like a celebration.
Since the cake stays moist for several days, it provides a convenient way to have a high-quality dessert on hand for unexpected guests. It is a versatile, crowd-pleasing addition to any baker’s repertoire.
Final Thoughts |
This red velvet cake combines a moist, cocoa-kissed crumb with a luxurious vanilla bean frosting. It balances the traditional elements of the dessert with a refined twist that emphasizes aroma and texture.
Choosing this recipe allows you to move away from overly sweet, artificial versions and toward a balanced, professional-grade cake. It is an excellent project for those who enjoy the process of baking as much as the eating.
Bring this vibrant, aromatic cake to your next gathering and watch it become the center of attention.
Red Velvet Cake with Vanilla Bean Frosting
- Total Time: 1 hour 5 minutes
- Yield: 12 servings 1x
Description
A sophisticated red velvet cake featuring a moist, cocoa-infused crumb and a luxurious frosting made with real vanilla bean seeds.
Ingredients
- 2 1/2 cups cake flour
- 1 1/2 cups granulated sugar
- 1 tsp baking soda
- 1 tsp salt
- 2 tbsp unsweetened cocoa powder
- 1 cup buttermilk, room temperature
- 2 large eggs, room temperature
- 1/2 cup vegetable oil
- 1 tsp vanilla extract
- 1 tbsp red food coloring
- 1 cup unsalted butter, softened
- 4 cups powdered sugar
- 1 vanilla bean, split and scraped
- 3 tbsp heavy cream
Instructions
- Preheat oven to 350°F (175°C). Grease two 8-inch cake pans and line the bottoms with parchment paper.
- In a large bowl, cream together softened butter and granulated sugar until light and fluffy.
- Beat in eggs one at a time, then stir in vegetable oil, vanilla extract, and red food coloring.
- In a separate bowl, sift together cake flour, cocoa powder, baking soda, and salt.
- Gradually add the dry ingredients to the wet mixture, alternating with buttermilk, mixing only until combined.
- Divide batter evenly between the two pans and bake for 30-35 minutes or until a toothpick comes out clean.
- Cool cakes in pans for 10 minutes, then transfer to a wire rack to cool completely.
- For the frosting, beat softened butter until smooth. Fold in vanilla bean seeds, powdered sugar, and heavy cream until stiff peaks form.
- Frost the first layer, top with the second layer, and cover the entire cake with the remaining vanilla bean frosting.
- Prep Time: 30 minutes
- Cook Time: 35 minutes
- Category: Dessert
- Method: Baking
- Cuisine: American